Sunday, 19 May 2013

Time to catch up!

I've noticed I am getting rather behind with my blog, so it is a little unorganised, story of my life! Well anyway, again I have been sat waiting for parts from GBS, sometimes I do wonder...but anyway, there have been a few things (sourced elsewhere for cheaper and quicker). So, lets go with whats been done.

First of all, I was waiting for a fair few weeks for a fuel swirl pot to arrive, so guessing on the capacity along with a bit of research, I settled for a 1.5 litre pot, which is apparently more that adequate compared to some 1litre pots used. Anyway, using the documents on kitspares, I plumbed in the swirl pot with fuel in from low pres. pump/filter, fuel to high pres. pump and fuel return to tank. Left is the fuel return from the fuel rail, covered with a latex glove finger.


 Next up was the push rods. I was recommended that the clutch needs the be bent to fit, however to allow a smoother brake pedal, I gave that one a slight kink too. Both are M8 bolts with the heads cut off and a chamfered edge in place.
As the angle required was unknown, the angles were estimated...using a vice and a hammer. Worked a treat. Brake side was spot on, clutch required some extra adjustment. They appear to work ok but with fluid in and proper testing will tell.


With not much else on, I thought I would fix up the dashboard with a trial fit. Looks ok to begin with and helps mould the scuttle nicely. Starting to look more car like...


 ...but to make it even better, the seat had to be fitted...started just as a trial fit to get to the stage of just dropping in when ready...


To a full fit with the harness in, side panel in with rivets along the sides and bottom and the top panels placed on top. Now thats looking like a car! Needless to say, with pedals in as well, I just had to sit in the car, admire my handy work and pretend to drive.....for half an hour!


Also, with the calipers returned from their refurb, I decided to fit  these as well. The fronts, waiting on my solution to the cycle wings to be delivered, were originally sorted with cable ties. Standard.


 So yeah, a fair amount, of which I have probably forgotten, has been done and tested and trial fitted. But this is roughly where I stand. Going up to the GBS open day next weekend, hoping to fetch my long awaited MX5 parts that were needing adapting to fit. Again, looking more like a car by the day of work.


Tuesday, 14 May 2013

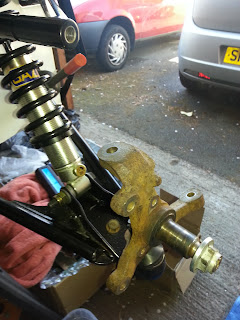
Wing Bracket to Hub Carrier Issues - Help!!

This is probably the first thing that has probably stumped me to an extent of needing a lot of help with. I have looked at Ford based kits and seen what has been done, however the hub carriers differ between the Ford and Mazda. The Ford has a pinch bolt which the cycle wing sits in and I believe a ball joint is used...may be wrong though...

Anyway, I have searched for help on RHOCaR and uploading pictures is an uphill struggle with photo hosting sites etc, most of which are blocked at work, so this is mainly for the very helpful members there to provide them a visual look at the problem I am finding.


 I have come up with the idea of a rose joint from the wishbone to fix to the top of a M12 bolt which is attaching the cycle wing bracket.....not sure how that will stand up for IVA though...

Sunday, 12 May 2013

Scuttle, Firewall and Dashboard

So the second part of the weekend I spent the time fixing the dashboard and scuttle assembly ready to be dropped in at the right time. Again I have got to a stage where other things need to be completed before I can continue with other areas. Part of this is due to poor planning on my part (give me a break! It's my first time) and others are waiting on GBS to either complete their Mazda Zero or get parts that I have requested to me.

Anyway, in the post "Fuel system, Diff, Panels, bit of everything really" at the end of April, you can see I have started to put together the scuttle by fixing the firewall and holding in place with loose rivnuts and clamps. I decided to fit the dashboard mounting bracket first to allow a better fit and strength to the scuttle panel. This however, had its issues....

You'll have to forgive the dodgy pictures, its all that sun we've been having! Anyway, if you squint, you can see that the dashboard bracket has been chopped up and adapted due to fixing issues. The problem I have come to is that either scuttle isn't formed to the profile of the bracket or the bracket has been laser cut with a too sharp profile....probably the later due to the scuttle looking pretty good now.


 Moving on I took my ventures indoors to catch the Formula 1 whilst I sorted the dashboard out properly. It was warmer and I could balance the scuttle easier to get the dashboard to fit properly.

TIP: GBS recommend using the drill in reverse and a slow speed rather than forward to prevent the gel coat chipping. I found this to be a slow process but did leave a very nice finish...however I did the odd hole in forward slowly which worked just as well if you're careful on the final stage.


I marked the holes from behind and drilled then drilled through from back to front starting with a 3mm drill bit. I then went for M8 bolts initially so drilled with 8.5mm drill bit for that extra bit of room to work. I had also smoothed the bracket holes out with a 10mm drill bit due to the poor laser cut holes and to ensure the easiest fit.
Anyway, 6 out of 8 holes fit. But the outer/lowest 2 holes don't line up as seen here. I left this until I got back to the garage to make sure it's not just a case of bending the scuttle a little bit further to fit.
I like the look of the black on orange, however, I am going to get some fancy bolts as it does look a bit tatty.


After the race I went to test my work out and double check the misalignment above. Turns out all is ok and it is simply a case of the scuttle bending a bit further. However, I found another problem, the bottom part of the dash rested on the top of the bracket for the ignition barrel. As a result the hacksaw was unleashed! I thought about this and decided to take out a new blade and go slowly to avoid any chips or cracking. It wasn't perfect but it worked, it's hidden by the steering column anyway so not a problem in my opinion, you wouldn't notice it if I didn't say!


The finished product. Will probably put the seat back in and decide where my dials are going to roughly sit. Must remember to avoid having dials blocked by the steering wheel for the IVA.