Thursday, 20 December 2012

Light at the end of the tunnel

Had a bit of time off work using up holiday days. Spent half the time on the car and the other half moving house, fun times! Either way, works well meaning I'm not in any huge rush to clear the garage out as I've got garage space at my new place to start building when my kit arrives in January.

Here is a load of pictures taken from these days.


Anyway, all that is waiting now is an engine crane to remove the engine and gearbox and then get down underneath for the remaining donor parts and jobs a good'un! Plus that pesky dashboard and passenger seat when I get round to them again....

Monday, 10 December 2012

Slowly but surely...

Not much was done today. In between getting stitches out and travelling to Birmingham, I managed to get a couple hours on the car.


With the car now up on axle stands I could start crawling around underneath it just that bit easier.

As you can see the bumper is off, we'll come back to that shortly.

First thing was to take the wheels off and wheel arch covers. The arches were a pain with some stupid plastic screws, every time they just disintergrated to the point I ended up using a drill and getting them out that way!

But once off I could reach the front wings and bumper to get these off.


Starting to look rather sad now. But anyway, the bumper finally came off finding bolts hiding under wheel arches and underneath. Note for future: Remember the plastic clips & screws that sit in the middle! These pesky connections baffled me for 30 mins until I looked down behind the bumper and saw 3 black clips with screws in. These quickly got bashed out with a length of wood and a hammer (yes, the time for calm and collected was well gone) but this proved to be the best way as they popped straight out in one piece. Anyway, bumper off!


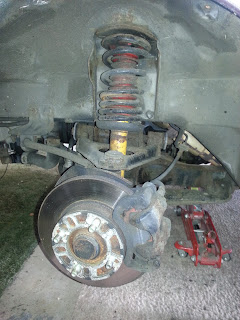
 Rear wheel arches/suspension/hubs/brake discs etc etc. These are more for personal reference as the rear wheels will probably go back on after a in depth discussion about engine removal techniques. All will be revealed once I decide how to do it and which is easiest.

 Again for personal reference of the front wheel arches etc. Looking a bit worse for wear but nothing a bit of cleanning can't fix when the time comes.

Once the car was jacked up, I realised that taking the front wheels off would be an issue with no one to put their foot on the brake pedal to keep the wheels from spinning....However, this is no issue for the master of disaster! A quick search through the garage sourced a metal pole which extended and retracted telescopically (that's my new word if it isn't already), anyway, I wedged this in between the brake pedal (clutch originally - ooops) and the body shell as seen below, and hey presto! Brakes applied and wheels off!

Genius.


Saturday, 1 December 2012

A quick play about.

Well I had taken Friday 30th November off work to get things ready for the Girlfriend's birthday weekend away. But due to the body clock being broken, I didn't have much of a lie in and instead got up a few hours earlier than planned and decided to use it to work on the car.
In the morning I managed to remove the rear bulkhead, it took a bit of trouble but came off....in two pieces. turns out it wasn't in as good a condition as it looked. Not to worry, it's out the way now.


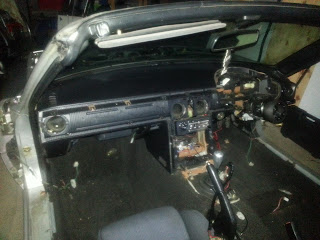
The dashboard is slowly coming off with the steering wheel and speedo instrument cluster out. The crash pads were rather tricky being stuck on with some Japanese silicon super glue, but nothing a flathead screw driver couldn't remove!


The headlights are out along with their surround as well as the front number plate and side light clusters. Just waiting on some axle stands and trolley jacks to get underneath the car the get some more body work off the car.  
This is where the steering wheel and instrument cluster used to be. Came out much easier with the crash pads off! Now a bit more space to see underneath the into the steering column.


Next step is to figure out how to get the rest of the dashboard off without severing electics and other valuable items!

Monday, 26 November 2012

Stripdown Continued

The breaking is going well, starting to focus a little more and concentrate on single areas instead of random parts.

Monday evening was spent in the garage for another few hours whilst Dad was infront of the fire with his feet up in the warm, watching the telly. Looks like I'm on my own here.

Anyway, the doors are now off along with the bonnet. The drivers seat is out but the passenger's side has a single bolt that has been rounded off by someone or is simply a crap bolt, eitherway, that'll take some seeing to. Right, less chat more pictures:

 As you can see the boot hasn't changed much since my last post. Trying to figure out how to get the hinges off...


 Engine still intact, thinking of leaving this til last and during daylight hours as it will be a tricky section to remove. 

All the electrics and running gear are going to be left until last as it will be easier to move the car with this in.

Passenger Door came off first.
Managed to use a cardboard box to help support the door as the hinges came off whilst I undid the wiring inside. The drivers side was easier as I took most the wiring out prior to removing the door. 


 Drivers seat came out no problem, still a comfy place to sit and work on the centre consoles. These are now also both out.


The ever growing pile of parts! Everything seen here must go! If you don't see it here, it is probably still on the car or hiding somewhere.

Contact me if there is anything you would like!

Thursday, 22 November 2012

Doomsday for the Mazda

Well I have a day off work to use up remaining holiday days. I decided now was going to be as good as any to sort the garage out and clear the space. So it took me half a day to clear out the rubbish my Nana and Grandad had built up in there over the years, but finally it was tidy enough to use as a work space.

I was lacking a few tools so went and bought the basics from Halfords, we'll call it an early Christmas present for myself  :-) I was so keen to start that at 4pm, I decided it was still light enough to do something. I don't have any mains power in the garage and its too far from the house to run an extension lead, so torch light and plenty of carrots will help me see through the dark better.


Before you all start wondering, the white box and cable is one of them vibration speakers. What better way to strip a car that using the bonnet and a big speaker!


The car looks rather sad as it is being prepared for breaking, unfortunately I did infact fall in love with the car after 2 months of driving it, so much so I am still rather tempted to sell the Punto I own and buy a newer MX5....we shall see though.

Anyway, after spending a couple of hours like a child with a big stack of presents, I had began taking parts off the car. As I was standing at the back, I thought I'd go from the back and remove all the body work/roof moving forward , then interior, electrics and finally the runnning gear etc. This happened briefly. I soon took one bit off and the nearest thing I could see came off next. Space was filling up quickly as there seems to be much more of the car in a pile that what there was on it! Anyway, here are some pictures.


Here is the aftermath of about 5 hours spent on the car.

Problems so far:
  • Underneath the car there is heavy rusting/rotting. Bumper/Mudflap screws are rotten and need drilling out.
  • Getting the roof off - There are more than 3 bolts either side, should have realised but in my excitement and the dark, was left in an awkward position undoing bolts underneath the hood!
  • Couple of sheared bolt heads - to be drilled out.

Friday, 9 November 2012

A Twinkle in my Eye

Today was the day I turned that twinkle into reality, I went from being a boy, to becoming a man (Mum, it's not what you think), I finally placed the order for the Starter Kit! It had occured to me one day driving the MX5 that I hadn't actually placed an order or even decided with the binding of money!

I looked to GBS, whom I had decided to go with, but realised that I had bought a MX5 for a kit that does not support it! D'oh, school boy error. Anyway, ignorng this slight issue, I perservered and found that on the GBS Blog, they were advertising the unveiling of an MX5 kit, phew, a bit of luck! Probably should have saved it for the build but there would be no build without it!

Anyway, after a trip up and a ride in the demostrator, I was sold. The kit looked easy enough to manage as a first build and I was assured (amongst seeing various posts) that the after sales service was top-notch.

Order due to arrive in January. Gives me enough time to clear the garage and have the MX5 stripped ready to be put straight into the Zero chassis....providing it all goes to plan!

Monday, 8 October 2012

The Donor Car

Well I have looked into the Kit Car industry much more since my last post and found that any Sierra model is currently quite hard to find. However, Mazda MX5s are on the up for kit cars and I decided that I would purchase one for my donor! So, Friday 5th October, I found one, and snapped it up. MOT and well looked after. Would be perfect. A 1990 MK1 Eunos Roadster 1.6 Japenese Import. 111K miles on the clock.


Overall, I very nice purchase for a very nicely reduced price (good bargaining skills you see). However, the previous owner was apparently livid that it was going to be broken for parts, and rightly so, I will probably feel the same when the day finaly comes, but keeping my eyes on the prize, I know I will have the strength to do it!

Anyway, MX5 taxed and insured for 2 months, and we're good to go!

Monday, 1 October 2012

The Background Story

Hello everyone who may be even vaguely interested in reading this. As you will probably know or have guessed, my name is Zach and I am planning to build myself a Kit Car.

This ambition was something that probably came out of a track day a few years ago where a friend invited my Dad and I along for a few passenger rides. Since witnessing the simplicity (using the term loosely) and the performance of such a machine I started thinking about one day, owning one myself.

I am currently on placement from studying Motorsport Engineering at Coventry University, taking place at LH in Barton-under-Needwood. From this I have realised and planned that a dream I thought to be decade in the future could be realistically achieved (financially at least) whilst on placement spending evenings and weekends working on it. My plan, is to have the car built and IVA'd by the summer of 2013. I have since found this to be an ambitious time frame for a part time builder but nonetheless, the plan is there.