Friday, 13 September 2019

When life takes over

So here we are, back at it, again, over 2 years since my last post. If I still have any fans, I hope you haven't lost too much sleep waiting for the next instalment!

Life really did take over the last 2-3 years. Deteriorating health, major surgery, end of a relationship, start of a new relationship, buying a house with new girlfriend and all whilst moving onwards and upwards through 2 new job! Hectic life really did take over, all things stopping that elusive "Garage Time". But here we are, at a point where the health is back, the saving is settled and the job jobbing along nicely. All means...you guessed it GARAGE TIME!!!

When we last spoke, the kit had just semi-successfully made it round the annual, 2017 RHOCAR Wales trip. Little tweaks and various events had happened since then so lets fill you in quick.

Post-Wales Job List

  • Fix Oil Leak
  • Quieter exhausts (I went hooligan mode and found it too much!)
  • New Intake
  • New Bonnet
  • Windscreen wipers
  • Refit Rear Diffuser

Not a bad list really. Anyway, they mostly got fixed. Windscreen wipers still elude me and stick occasionally if its not wet enough - I tend to avoid the wet weather nowadays.

Events
A couple events attended:
  • Stoneleigh Kit Car Show 2018 & 2019
  • Coventry Motofest 2018
  • Wales Trip 2018
Stoneleigh shows both went without issue. Motofest and Wales.... not so much.

These issues can primarily be attributed to the new intake manifold


The issue came from the injector rail return hose having to be adjusted (pulled and held) out the way of the new throttle body, this led to a kink to the swirl pot meaning fuel was being prevented from returning to the swirl pot/tank, resulting in fuel boiling and engine stopping. 

It was first noticed at Coventry Motofest in the heat, resulting in this wonderful image at the Motofest Parade lap start line:


Same problem, traffic, heat, basically no fuel, engine cut. However it did manage a trip to the start line queue which meant my friend could grab this epic picture:


 Moving to Wales I thought I had solved it, remove kink, heatshield the swirlpot, cut the side panels out and flare. Alas, despite getting to Wales without issue, the warmer weather Sunday and traffic meant a tricky journey home and the last straw being stuck in the middle land of the M6 with traffic beginning to move and me stuck trying to get the engine to start again!


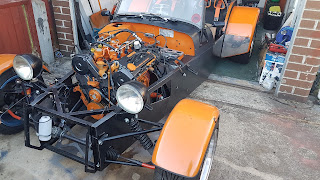
All this meant I really needed to sort the problem and get the car sorted. The list of niggles had increased to the point it would be easier to take it off the road and sort out all the problems in one go, front to back. Plus, the intake and exhaust side of things were developing and the fuel system was getting a total overhaul.

So here we go, time to see if I can focus on this blog again.

Monday, 14 August 2017

RHOCAR Wales Trip 2017

So here we are, the annual Kit Car Club pilgrimage to Nefyn, North West Wales. A trip that has grown in size each year and finally, the first one I have made in the kit car! I tried to be ready for the journey in 2016, however the car was far from finished so I had to go in the old tin top. Whilst it was a cracking drive, it fueled the need to get the kit car finished to experience some of these roads!

The weekend started perfectly, car fired up first time, made it no problems to the petrol station, filled with fuel with no leaks and then made it to the first meeting point without any issues! I think there was more surprise than anything else! Anyway, onwards we went. It was our first stop however around 100miles later that I realised I may have an issue. This was not something majorly apparent until we stopped for fuel and I noticed a lovely trail of oil drops following the approximate route of my car. When I investigated, I noticed there was a nice puddle forming under the car. My previous oil leak was not 100% fixed. Thankfully the leak was minor. I was a drip every few seconds, more of a bad seep than leak. I had anticipated this and luckily had 5 litres of oil with me. A quick check of the dipstick and we would be good til the lunch stop. I could let it cool and settle back and assess the problem there.

Turned out it was not a problem and here were are parked up in the Fairway Country Hotel in Nefyn, all under its own power!
The first stage was complete, the Zero made it!


Saturday morning we met at Richy's house. He had a jack so I could get under the car and see if I could solve the leak as I was losing oil at around 1 litre per 100 miles....yikes. Thankfully I managed to tighten it up but the issue was due to monumental engine rock (clearly the mounts from GBS can't handle the V6 torque!) this meant the oil cooler was catching on the chassis rail pulling it away from the block, hence the leak.


Undeterred we continued through the rain. Oil became as consumable as fuel and I kept on top of it. The harder I drove the more I lost, so kept my driving rather sedate, helped further as it was the first time in the rain with the new engine and these cars are a handful in the wet at the best of times!


Lunch on Saturday came round fairly quickly, and still no breakdowns! Some might say it was as good as sorted! No more issues and definitely no show stoppers. So on we drove!


One of the far back action shots of the day. Best part about these runs is seeing all the kits in convoy, especially in the hills where you can capture a number in a single shot!


Our final stop on Saturday meant taking over a car park and photo shoot. A successful day driving with the weather picking up in the afternoon and still all the cars going strong! Even I was still going....despite the obvious oil issue.


On Sunday there was an opportunity to have a further run out taking a scenic route back towards home. With the obvious oil leak needing a permanent repair and my oil loss meaning every extra mile meant extra cost to replace the oil lost, I decided it would be best to head straight home. The aim of the trip was to survive without breakdowns and ensure I made it to Wales as I didn't wish to miss out another year of this fantastic trip.


Clearly the best option after all this was to swing by Nandos and pick up a well deserved dinner so I could collapse on the sofa. One thing I have learnt from this trip is the stress and experience this car now provides is exhausting!


However the trooper made it home and straight into the garage without any new problems. Here it will stay for a while as I recuperate and begin making the 'Post Wales Fix List'... it could be extensive!


Nevertheless, mission accomplished! The V6 swap took longer than anticipated and as the Robin Hood spirit goes, it was bodged together to get it round the 600 mile trip. Other than the oil leak and deafening exhausts, it was overall a successful shakedown ready to refine things over winter. Time for a rest though!

Saturday, 5 August 2017

Rolling Road - Attempt 2

So here we go again, off to Steve Walford Motorsport to give the V6 another shot. With the Wales Trip next week, it was make or break. The plan was to get the car driveable. Unfortunately, as mentioned in the last post, this was off to a bad start....my car wasn't charging and the alternator was dead! As it turned out, the 100amp fuse protecting the system from the overload I'd experienced with touching the alternator live to the chassis had in fact done its job. With no alternatives, it was done without a fuse. I wouldn't recommend this however I was confident the reason was earthing the live side.

This time, you lot are in for a treat. my good friend Stu, theduck, has recently begun doing his own YouTube channel to document his own vehicular shenanigans. He came along to record, in his words, "the fireworks".....


So there we have it. Not the figures I was aiming for however there are a significant number of "get it running" components on the car. I can now use the car effectively and begin to rack up the miles before a 2nd summer is up!

For those who didn't watch, the Zero V6 managed 155bhp and 188lb-ft. I'll take that. There is definitely more to come! Time to get the car home and get ready for Wales next weekend! Nothing like a 600+ mile trip for its first proper outing!

Sunday, 30 July 2017

Rolling Road Fix List

So here we go again, another issue to find and fix. This time however it was quite serious with no oil flowing! First thing first was to get the sump off. Best case, there was a chunk of this sealant gunk used blocking the pick up pipe. Nope, that was clear....there goes the easy fix!
Best strip this down further.


Oh wait a minute, would you look at that! Monumental cracking! This is the bit the pick up pipe connects to, going to the oil pump. No wonder it wasn't picking anything up!


Unfortunately It is quite a severe crack, going a good distance up the pipe. It is clear to see (with the actual part in hand) that the over-tightening of a bolt on the front of the engine has resulted in this crack. Quite possibly self inflicted. *Hangs head in shame.


However, this has been limited to just the oil pump, which as it turns out, is very easy to change in situ. Especially when I have a spare engine already out the car to practice on!

Pumps off, new spare pump on. All in under an hour! Brilliant!

A quick fire up to check the flow of oil is back and top job! All done and no leaks or horrible oil starvation related noises!

On to the next issue.....


One of the problems I also appeared to have was the alternator wasn't charging. Having purchased a nice and small 40amp alternator, I figured the 120amp standard on the MX6 may have meant the V6 pulled more amps than expected. -We will unsurprisingly revisit this in the future, so keep your eyes peeled!

A new fancy mounting bracket and an old MX5 alternator is fitted. These were rated at 70amps-90amps depending on the year, so with mine unknown, I knew it was at least more than my 40amp.

As it later transpired on the way to the rolling road session part 2 (to follow soon), I had actually blown the 100amp fuse when I had forgot to disconnect the battery and the live wire touched the chassis. I hadn't thought too much of it then as I was more relieved there had not been flames! Again, an easy fix in the end, despite the unnecessary work head scratching!

Finally, the one thing that really slowed down the whole process was my intake set up. I didn't have the facilities to manufacture my throttle body set up accurately enough (which apparently needs to be pretty bloody accurate!). Therefore, with the RHOCAR annual pilgrimage to Wales drawing closer, I decided it was necessary to utilise whatever I could get my hands on and and make something that worked. It was 2 weeks until Wales so I had 1 weekend to make it and another weekend to map it. No pressure, right? At least Stoneleigh was close enough to home break down with.....


A little bit of inspiration from a design I had seen online for a KL turbo build, I copied the idea with some 63mm OD tube I could get hold of quickly, due to time needing to be made and ready for the RHOCAR Wales Trip,  I wasn't missing another one!


With it tacked in place, it started to look the business. It wasn't pretty but it would be a hell of a lot easier to map than the previous 6 throttle bodies!


With a "design" using what was readily available, packaging and aesthetics were not high on the list, function was. Hilariously, this would now be poking out the bonnet which isn't ideal due to my seats being lower (thanks to the carbon fibre ones, but lends itself to a Mad Max kind of look! It's growing on me!


In an ideal world, these would go on to something shorter and still incorporating the injectors/fuel rail. Again, no time so out with the throttle butterflies from the triumph bodies, and silicone hose to clamp together. Luckily there is no very limited movement thanks to 6 of them and being able to virtually mount it metal to metal.


Lets get this on the truck and get it mapped!


Saturday, 22 July 2017

Rolling Road for the V6 - Attempt 1

So, here we are. New flywheel spacer in, initial V6 engine running on all 6 cylinders....mostly. Best get it off to that rolling road and get this thing tuned! My choice was Steve Walford Motorsport as recommended by a number of previous customers. Based in Northfield - Birmingham, it was an easy job of hiring a trailer and off we go.

In the build up waiting for this day I'd also refitted all the wet weather gear. This is England and the summer still has rain! Here it is, usable all year!


Thankfully though the weather on the day was good. That was about the best part of the day. We arrived and started to unload the car and I found this.....

 Yep, oil. A nice puddle of it. I got the car off the trailer and checked the dipstick. Still full? So we pressed on vowing to keep an eye on it.

I've since put this down to oil left over from when the filter came off and sprayed oil everywhere just running out the chassis.


 First job for Steve was to get the throttle bodies balanced. I had tried but obviously my close enough is in fact not close enough.

A couple hours later Steve admitted they were hard to do, I'll be open and say thats due to my extensions not being ideal and each throttle body is slightly not parallel to the next one, meaning they unbalance very quickly or stick open.


After a few hours of setting up, fiddling with the throttle bodies and general chit chat we were getting to the point of giving it a go.

Suddenly the engine just died. Stopped dead. Not run out of fuel or turned the key off and a few rotations later cut out, literally stopped like a switch. "Thunk". Weird as it was sat idling. Anyway, after a bit of head scratching and looking we started it back up to see what happened. Started no issue...then a short time later an almighty squealing broke out! 3 of us scrambling to turn the key off! Something was not right!

Upon investigation we found there was no oil flowing to the top of the engine. Had the clunking stop being something breaking?  It definitely used to pump oil as it sprayed out everywhere before! Well with no quick and easy fix, this picture to the right is the closest I got to getting on the rollers. No oil, no running. The squealing was probably something missing its lubrication and starting to get rather warm....


Push it back on to the trailer, defeated. Not the outcome I had expected from today. Although it was not wasted. Steve gave me a lot of things to consider, most specifically with the intake set up. Whilst the individual throttle bodies are great...they are a PITA to sort out. As I am running out of time for this summer, a different approach may be on the cards.......

Sunday, 21 May 2017

Put your engine in, take your engine out, in, out, in, out and shake it all about...

Time to see who amongst you has that keen eye for detail. With my last post title, you may have noticed I called it The "Good" Engine. If you missed it, the emphasis is on the: "Good".

As you know I have been very slack with keeping this blog up to date, so I have found problems and fixed them probably 3 months earlier. Well this is one. New engine in, final few bits before Coventry Motofest....and this happens:


I can confirm that is 100% oil as I have gone all of nowhere and the dipstick that once read 'max' now reads 'min'. Coolant is still brimmed to the top in the radiator so nothing going there.

Well damn. The curse of Project V6 strikes again! I was planning a rebuild at some point but really was not planning one right now! Looks like I'm putting the other engine back in again then! At least that was most likely just a firing order problem.

Still, I was desperate to go to Motofest. It is even more on my doorstep than Stoneleigh was, however if my garage was looking like this, I definitely would get a telling off from the Motofest officials!


So here we go again, a view coming all too common. I had given Steve (from RHOCAR) a call as he had offered to help out if I needed it. I still should not be doing any heavy lifting so it's always good to have some muscle on hand!

Engine out, again.


Being a typical British May, rain began to delay play. Seemed like a perfect opportunity to stop for dinner. What better way to keep your help happy than buying them dinner?


Unfortunately the rain persisted and after an unintentionally long break for dinner, we had another stab in the rain. As the curse continued, the engine was proving difficult to get back in with the gearbox in situ (removing the gearbox as well meant either throwing oil everywhere or disconnecting the prop from the diff - which meant seat out and side panel off - just effort isn't it?). In the end....at about midnight, we threw the towel in. Shoved the car into the garage and called it a night. I would have a look in the morning to see whats going on and maybe do all that effort and get the gearbox out after all.

As it happened, my parents were coming to visit and come to Motofest too. Stories of previous years and an ever growing event tempted them to come along. Luckily they arrived at a time I was trying to understand what was happening with the engine/gearbox and suddenly I had an extra pair of hands again! Behold, the rare picture of my Dad getting stuck in and getting his hands dirty! I did have to dig out my most stretchy joggers and tshirt as not to ruin his clothes...


I'll make an enthusiast out of him yet!


Anyway, once in roughly the right place I went to check that it was all lined up and that it would work....and I found this:


I apologise if the video is a bit rubbish, not a lot of space and not an ideal view. If you can't see, the flywheel is not spinning straight. It has a lovely wobble on it as if it is not sat flat. Time to get the engine back out...again!


This time the whole unit came out. I'm not going to faff around again. Already I can see an issue....my flat adapter is now a banana!


 The next issue is all the crap on the flywheel mounting face! The adapter was properly wedged in too! Then I noticed this....

Having designed this myself, I knew that edge should be straight! It would appear to have been crushed when putting the flywheel on. Rookie mistake and soft aluminium.


 Thankfully during the week of figuring out and deciding what to do, I contacted Rich (RHOCAR Chairman and Red Seven Engineering) who made the original and asked if he could do me a new spacer but this time, out of steel.
This is where the club came into its our, 24 hours later, I collected this magnificent item.


 Having identified the root cause, I ensured it would not happen again. Deeper step!
 - I had designed the original spacer to the lightweight flywheel I had. Due to issues with the threads for the clutch plate, I'd swapped back to the original flywheel. This had a deeper crank mounting face which was subsequently filled when putting the flywheel on by crushing the spacer. Simple really.


With this in my hand, it was all go again. Next race to finish, RHOCAR's Annual Wales Trip!

Saturday, 20 May 2017

The "Good" Engine

We left the last post having just dropped my 2nd engine out of the MX6 having had trouble with the initial engine having a few low compression figures on the cylinders that weren't firing. I had tested the engine in the MX6 and had slightly lower figures but they were all consistent so it was a decent place to start from.

With the engine all painted up and attached with all the necessary ancillaries, it was ready to go back in. I've had the engine in and out so much I decided on this lovely sunny day that I would do it myself and hopefully be ready in time to enjoy the rest of summer. Only issue is I'm still "recovering" from my surgery so probably get a slap on the wrist by the doctors for this. I'll take it easy. Promise.


Nearly there on this photo. Nice and easy to get back in. See. About time something started going right...


Whoops. Spoke to soon. Struggling to get the gearbox and engine to mate up properly. This would be much easier with someone not under doctors orders to help wiggle the engine about. Too late to turn back now! Thankfully it didn't take much to get done properly.


Another standard "engine back in" photo opportunity. Sooooo much space in front of the engine. Nicely bringing the weight back

Thought it was also a good time to put my new aluminium radiator on to help deal with the extra heat this thing may produce. Not that I currently have a working temp sensor to use....eitherway, looks nice. Rad, fan and shroud from a '92-'00 Honda Civic, cost about £60 delivered. Bargain compared to the GBS one at over £300!! Only thing I need to do is some fixing brackets. Easy that. 4x 1.5mm mild steel flat bar, 8 holes, bolt up and job done!


So, with that back in, I guess I should fire it up and test Jez's theory on the new firing order.

[insert video of it backfiring through the throttle bodies and not starting - use your imagination on this one, camera wasn't running]

As you can hopefully see from your imagined video, it didn't work. It wouldn't even start. Maybe the infallible Jez has finally been beaten! Back to my original firing order from Stoneleigh.

[insert second imaginary video of backfiring and not starting]


Yep now I'm confused. I mean, it backfired less but still would not start. Double checked leads vs Stoneleigh. Nope, still the same. What is going on here?! One thing mentioned at Stoneleigh was timing. Was that correct. I'd double checked once home and both the mechanical timing and also the microsquirt timing was all spot on as it should. As this had given me consistent compression test results, I'd assumed this was also fine (having also ran no issues prior to being removed).


Anyway, sanity check as a starting point.......oh whats this? These two red circles should overlay. With the crank in the correct position, the cams are miles off!


As seen here as well. Both sides a fair distance out.


Don't ask me how. I do not know. Belt tension is fine, so is the tensioner. I've not even had the front cover off until now! Something jumped somewhere.....


Anyway, grabbed my Haynes manual and double checked I wasn't going mad, reset the timing and away we go. Luckily Mazda like their non-interference engines so cranking this one didn't do any damage to the valves.

Partly due to keeping a known firing order that had the engine running but mostly due to the fact the ignition leads hadn't been touched, I fired it up. On the button. Like it had never been sat at all. These Mazda engines are awesome. Well...they would be if they fired on all cylinders. Alas I was still on 3 cylinders.

Time to see if the timing had been ruining Jez's theory...new firing order in....fired into life! Lots of smoke and burning from the cylinders originally vacant of combustion! We have a winner! Jez saves the day.....again. All 6 cylinders now reporting for duty!

Well, it would be rude not to test it.....just ignore all the smoke. Its no Prius.


And, for the first time since the engine swap, making it home under its own power! You'll want your volume up for this! It would now rev so so much cleaner. What used to be thought as a bad tune, turned out to be half an engine being dragged along. I think its on par with the first ever drive in the Zero to be quite honest. Can't wait to have it tuned properly and running sweet.


Well then. With that sorted, looks like I'll be going on my way soon! Next show, Coventry Motofest, its on my doorstep so should have no problems at least rolling down the road!

Saturday, 13 May 2017

Post Stoneleigh Fix Sheet

As we just saw, my Stoneleigh Show went swimmingly. I arrived with problems and left with less problems. However the problems are still pretty substantial.

So, here goes. First up, it was suggested I compression tested the engine. This would at least eliminate if I had any issues in that department in case everything else was actually ok.


From factory, these engines should have around 210 PSI on the compression test, a warm engine too. I was not too worried about needing to do the test warm, this was basically to ensure the levels were even across the 6 cylinders. If it didn't show anything then I can always retest later. As it happened, the values fluctuated from 110-125 up to 150-160 across all 6, 3 in the lower range, 3 in the upper. Unfortunately the lower 3 were the ones not firing and the upper 3 were. This maybe half suggested there was an issue with the compression. Further to this, I dropped a teaspoon of oil down the bores, this would help identify if the issue was piston rings or in the cylinder head.

All the figures rose, however the lower 3 remained lower and, as seen to the right, good cylinder 6 hit nearly 300 psi! So, all the rings are worn....some a lot more than others. At least that is easier than a head....right?


A quick check on the spare engine left me with much more consistent figures around 145psi over all 6 cylinders, this would at least mean there was not an major issue with unbalanced compression. Still recovering from my Op, I needed some help with the heavy lifting, the first engine was a pain to get out by myself, my body wouldn't cope with that right now. *RHOCAR spot light to the sky - Batman style!

 With the help of Stu and Gaz, we dropped the engine from the Zero, and began setting about getting the other engine from the leftover MX6 still sat in my garden. Good job I bought two!


The problem I had with the MX6 was the fact the car is still 20+ years old. This means rust has well and truly set in and with a transverse engine set up, the rear exhaust manifold is neigh on impossible to get off. Enter, the angle grinder!


 A good 6 hours spent dropping two engines out the cars left me with this. A nice looking engine that does not work properly, and an old crappy engine that I can neither confirm or deny the status of. Both cars ran smoothly prior to being dumped in my garden so clearly I have done something wrong....or left these engines sitting for too long...my money is on me though.


My garden now is looking like a bit of a scrap yard....again. It is probably worth noting that Jez, my electrical saviour, arrived after all the fun was over, bearing good news! He believes that it was in fact my firing order that was wrong! I shall do a detailed post on this later, simplified though, using a Ford EDIS 6 system and trying to match that up to the KL V6 firing order could potentially leave me with 3 cylinders firing at the wrong time. Well if the shoe fits......However, as you can see, the news was just a little too late to test the theory. I may as well carry on with this spare engine now, just in case....


Shouldn't this be stripped down by now? Oh wait, it is the spare engine all cleaned and dressed up again, this time with a matching colour scheme and not the Hemi Orange mixed in.


It is now looking very nice, better than the other engine if I dare say so myself!

Well, I suppose I better start getting this back in....